Tired of waiting on a developer every time you need to add a simple tracking pixel? Are your marketing campaigns stuck in the queue behind technical deployments? If you want to learn how to set up Google Tag Manager properly, this complete guide is the answer.
This isn't just another technical article. It's the result of hundreds of GTM implementations, boiled down to the practical keys you need to master Google Tag Manager from A to Z. You'll learn how to install Google Tag Manager, structure your tracking like a professional, connect your tools efficiently and use its advanced features to turn your data into strategic decisions.
Get ready to take back control of your web tracking.
Google Tag Manager: what is it and why is it essential?
Picture a control tower for all the data on your website. That's exactly what Google Tag Manager is. This free Google system, a true tag management system, centralises every tracking script you run (Google Analytics, Meta and TikTok pixels, heatmap tools and so on) in a single interface, with no need to touch your site's source code each time.

Adopting GTM isn't optional, it's a strategic necessity for three big reasons:
🚀 Radical agility: Deploy tracking for a new ad campaign, test a new analytics solution or update your configurations in minutes, not days. This agile tracking finally decouples marketing from engineering. ✅ Quality and control: No more scattered scripts and error-prone deployments. Google Tag Manager gives you a single view of everything that's live on your site. You avoid the duplicates that skew your data and keep a clear, scalable tracking architecture. The quality of your data improves dramatically. ⚡ Optimised performance: GTM loads scripts asynchronously. In practice, that means a slow tracking script will never block your web page from loading, which protects both your user experience and your SEO.
Step 1: Installing and configuring Google Tag Manager
Create your account and your first Google Tag Manager container
Go to tagmanager.google.com and sign in with your Google account.
- Create an account: Usually named after your company. One account can hold several configurations.
- Create a container: This is the "box" that holds every tag for ONE website. Name your Google container after your site's URL (e.g.
www.mygreatstore.com) and select the Web type.
Once this setup is created, GTM hands you two essential JavaScript code snippets and your container ID (e.g. GTM-XXXXXXX).
Install the code snippets
Google Tag Manager asks you to place:
- A JavaScript script as high as possible in the tag
<head>of every page. - A
<noscript>snippet right after the opening tag<body>.
Why two snippets? The <head> code is the main engine and runs on JavaScript. The <body> code is a fallback that allows very limited tracking if the user has disabled JavaScript. It's a sign of a robust setup.
⚠️ Pitfall to avoid: double tracking The most common mistake is to set up Google Tag Manager, add the Google Analytics 4 tag inside it... and leave the old GA4 code hard-coded on the site. Every hit is counted twice, which completely distorts your data and your reports. Golden rule: once Google Analytics is managed through GTM, its code must not appear anywhere else on your site. For a deeper look at Google's analytics platform and how it works alongside Google Tag Manager, read our guide: Google Analytics : the complete guide to improving your SEO.
Step 2: Understanding the key components of GTM
To master Google Tag Manager, you need to think the way it does. Everything rests on a three-ingredient recipe.
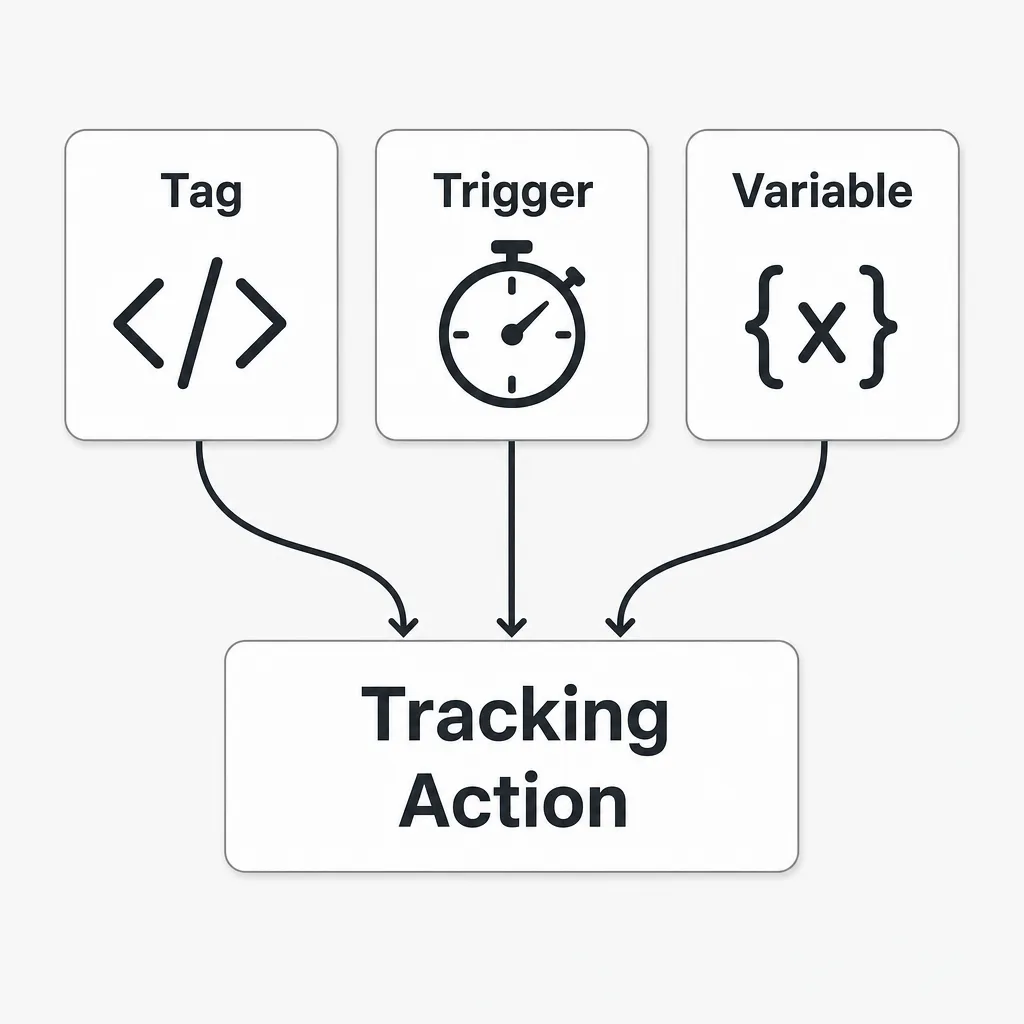
- Tags: the action. This is the code you want to run. A tag in Google Tag Manager is a powerful building block. Examples: "Send a page view to Google Analytics", "Fire a LinkedIn campaign pixel", "Load a heatmap script". GTM ships with dozens of pre-built templates, which makes creating tags much simpler. A well-built Google Tag Manager tag is the key to measurement.
- Triggers: the "when". This is the condition that makes the tag fire. A trigger listens to what's happening on the page and tells the script to run. Examples of triggers: "When a page is viewed", "When the user clicks the 'Add to cart' button", "When a contact form is submitted successfully", "When the user clicks an outbound link".
- Variables: the dynamic information. These are small containers of information that make your configurations smart. Variables can pick up a value that changes from one page or one action to the next, and they're essential for feeding custom tags.
- Built-in variables: Page URL, Click ID, Scroll Depth Threshold...
- User-defined variables: an order value, a product ID, a category name...
✨ Pro tip: the constant variable To configure your Google tag cleanly, create a variable of type "Constant" in GTM and name it GA4 - Measurement ID. Paste your G-XXXXXXXXXX ID into it. From now on, every GA4 configuration you set up only needs to reference this variable. It's the ideal way to keep your analytics setup clean, fast and future-proof.
The dataLayer: the nervous system of your data collection
The dataLayer is the cornerstone of advanced, reliable tracking. It's a JavaScript object that acts as a bridge between your website and Google Tag Manager. Instead of GTM "scraping" information off the page (which is fragile), your site pushes structured data into the dataLayer.

For example, on an order confirmation page, your developer can add this simple JavaScript code:
window.dataLayer = window.dataLayer || [];window.dataLayer.push({'event': 'purchase','ecommerce': {'transaction_id': 'T12345','value': 99.95,'currency': 'USD','items': [{'item_id': 'SKU123','item_name': 'Super Widget','price': 99.95,'quantity': 1}]}});
In GTM, all you need is a trigger for the purchase event and a few "Data Layer Variable" variables to retrieve data such as ecommerce.transaction_id or ecommerce.value. It's incredibly robust for measuring conversions.
Step 3: Testing and publishing like a professional
The three-point validation process:
- GTM Preview mode: Your best friend. It opens your site in a separate tab with a debugging console that shows you in real time which tags fire (or don't) and why. This is the key step for validating your tracking.
- Google Tag Assistant: Google's debugging tool (tagassistant.google.com, with its Chrome companion extension) that checks your Google tags (GTM, GA4, Ads) are correctly installed on any web page.
- GA4 DebugView: The real-time view inside Google Analytics that confirms your events and their data parameters are arriving as expected.
Workspaces, versions and best practices for your tagging
- Naming convention: Be disciplined. A clear structure such as
Tag Type - Name - Detail(e.g.GA4 Event - generate_lead - Footer Contact Form) will save you hours. - Workspaces: Let several people work on the same Google Tag Manager configuration without stepping on each other's toes. Ideal for agencies and large teams.
- Versioning: Every time you hit "Publish", GTM archives a version. If you introduce a bug, you can roll back to the previous version in one click. It's your safety net.
- Permissions: Managing permissions properly is crucial. Only give "Publish" rights to one or two trusted people. The rest of the team can have "Edit" or "Read" access.
Case study: Implementing GTM for ecommerce tracking
Your choice of ecommerce platform has a direct impact on how you implement Google Tag Manager. If your project is still at the starting line, our PrestaShop vs Shopify comparison will help you see clearly before you dive into the technical setup and the tracking of your goals.
On PrestaShop
The healthiest approach is to use a dedicated, well-established GTM module. A good module doesn't just install the snippets correctly, it also pre-configures the dataLayer for every standard ecommerce event (product view, add to cart, purchase...). That's a huge win in both time and reliability for your analytics.
On Shopify
The integration is a little more specific:
- The GTM
<head>snippet goes into your theme filetheme.liquid. - Watch out: For purchase and conversion measurement, the checkout is off-limits to theme code, and the old "Additional scripts" box is gone. Instead, add a custom pixel under
Settings > Customer events. That's where you subscribe to thecheckout_completedevent and push the order data (order.id,total_price, etc.) into thedataLayer.
Advanced techniques and analytics with Google Tag Manager
Once you've nailed the basics, Google Tag Manager becomes a real playground:
- Scroll tracking: Set up a trigger when the user reaches 25%, 50%, 75% and 90% of a page to measure genuine engagement.
- Video tracking: Know who started, paused or watched your embedded YouTube videos to the end, thanks to dedicated triggers.
- JavaScript error detection: Set up a tag that fires on JavaScript errors to alert your technical team.
- Advanced click tracking: Pinpoint every user click on links or buttons, even when they have no unique ID, for a finer analysis of user journeys. Every click can be a valuable source of data.
- GDPR and CCPA compliance with Consent Mode: GTM has Google's "Consent Mode v2" built in. It adjusts how your scripts behave (Google Ads, Google Analytics, even a Floodlight tag) according to the consent the user gives through your cookie banner, so your data collection stays privacy-compliant.
Conclusion: The power of the Google Tag Manager and Google Analytics duo
Google Tag Manager is far more than a technical platform. It's a shift in mindset. It's the ability to say "yes" to marketing opportunities, to measure what really matters for your business and to build a reliable, agile analytics ecosystem.
By following the steps in this guide, you now have the foundations not just to use GTM, but to turn it into a genuine competitive advantage for your analytics. Mastering this ecosystem is essential if you want to steer your website's performance.
Frequently asked questions
How do I set up Google Ads conversion tracking in Google Tag Manager?
In Google Tag Manager, create a new tag of type "Google Ads Conversion Tracking". Enter the Conversion ID and Conversion Label provided by Google Ads. Then create a trigger for your thank-you page (e.g. Page URL contains /order-confirmation). Test, publish, and you'll be able to measure the impact of your campaigns on your conversions.
Is Google Tag Manager really free?
Yes, the standard version of GTM is 100% free and extremely powerful. It covers the web tracking needs of most businesses. The paid version, Tag Manager 360, is aimed at very large enterprises that need support and advanced analytics integrations.
Can Google Tag Manager slow down my site?
Correctly configured, no. Thanks to asynchronous loading, it performs far better than hard-coding 10 different scripts into your pages. The risk comes from a pile-up of poorly optimised configurations or one very heavy pixel. A regular audit of your container is good housekeeping.
Let AI Handle Your Content Publishing
Alya researches keywords, writes and publishes content directly to your CMS, WordPress, Shopify, Wix and more, on autopilot.